INTEGRATE
SOLAR ELECTRICITY
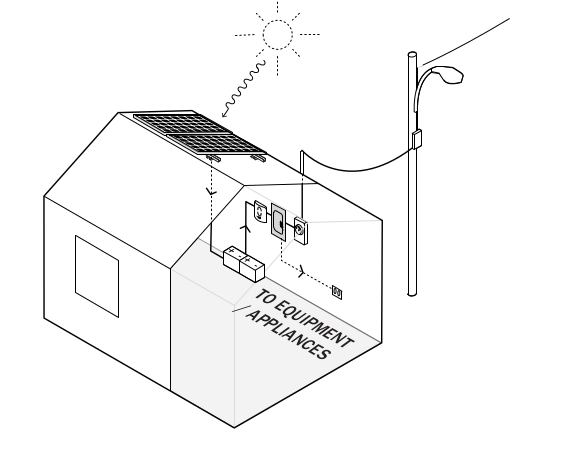
| Successful installations of photovoltaic (PV) panels across Puerto Rico are increasing. PV panels provide some portion, if not all, of a home’s energy needs, while making it less dependent on the system. This strategy focuses on explaining the basics of how to evaluate a home’s potential for solar energy use as well as the basics of how to harness its possibilities. | Strategy in Action 1. Identify Power Needs 2. Identify the Appropriate PV System Configuration 3. Install the System 4. Connect the Residential System to an Inverter 5. Connect the System to Batteries |
WHAT YOU NEED TO KNOW
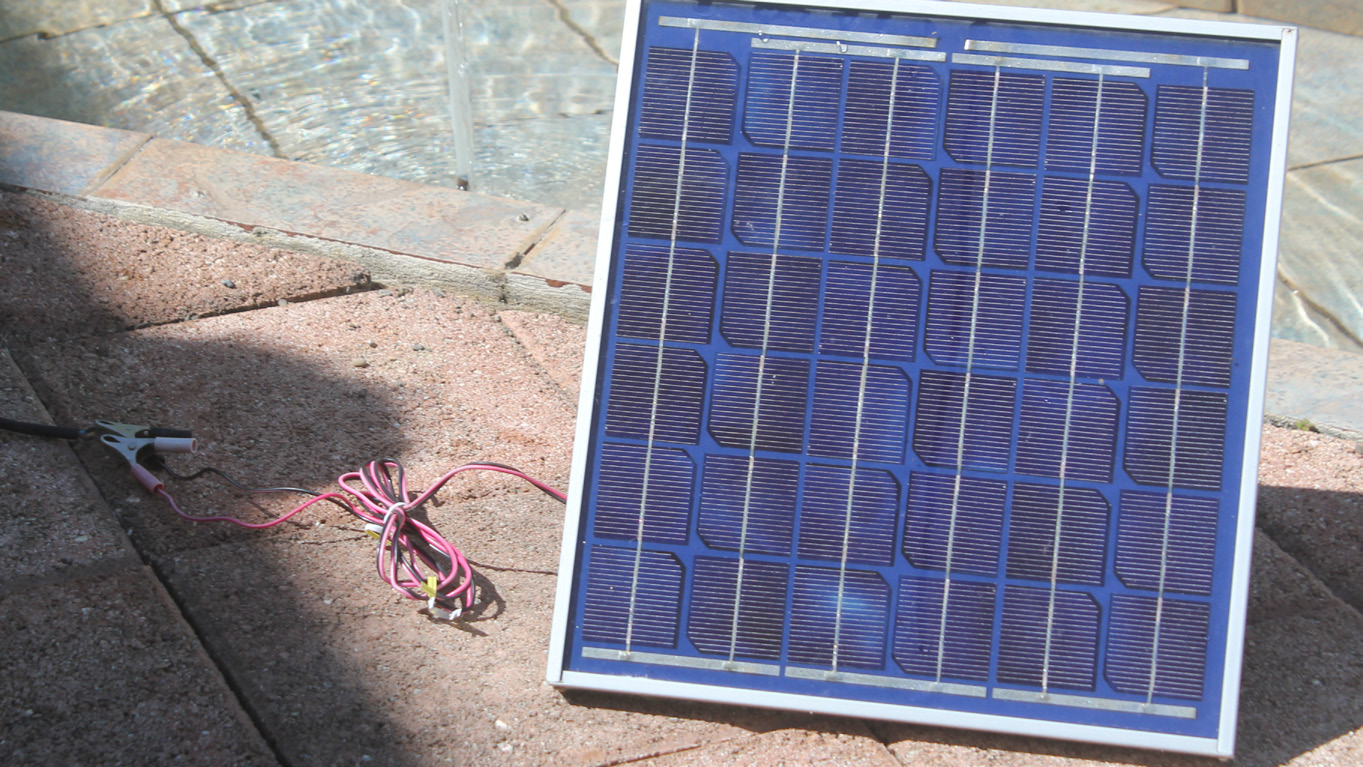
- A photovoltaic module (PV), also known as a “solar panel,” is a technology that converts sunlight into electrical energy. There are three different PV modules available, which vary in material composition, internal structure as well as cost. Photovoltaic modules vary in size mainly due to the number of solar cells connected in series. Generally, 60-cell and 72-cell modules are commonly found in residential and larger commercial installations.
- Monocrystalline: these are cells made out of silicon that are formed into bars and cut into wafers. Typically, they are of a dark black hue color with even texture (high efficiency, leads PV market).
- Polycrystalline: cells that are made out of silicone fragments and are melted together to form the wafers. They are slightly less efficient but can be cost effective. This is the recommended and most common type in Puerto Rico.
- Thin layer or thin film: cells made out of a translucent material that maximizes light and visibility but is not as efficient. It is also more expensive.
- PV arrays are composed of multiple modules made up of two layers of semiconductor material with opposite charges. When sunlight hits their surface, it knocks electrons loose, makes them move through the layers, and creates a current (see below).
- PV arrays are connected in series referred to as “strings.”
- For autonomous systems, some PV systems inverters include charge controllers which redirects power from the PV or power authority to charge the batteries.
- An inverter is a device that takes stored energy and converts it from direct current (DC) to alternating current (AC), which is the type of frequency used by most fixtures and appliances.
- Arrays can be connected to a battery pack to store energy if the grid is not available.
- If switching completely to solar energy is not an option, at least use solar modules as backup power by installing a small array only to power critical loads.
- A grid-tie inverter converts direct current (DC) from PV modules to alternating current (AC) and voltage levels compatible to the utility grid (synchronized to 60 hertz).
- A stand-alone inverter converts stored energy in batteries, electrically transforming direct current (DC) to alternating current (AC).
- Power conditioning units are intelligent units that monitor charge, usage, and supplement difference with stored energy while simultaneously charging from the grid. These can be used in interconnected and bimodal systems.

- Refer to Strategy 15 to determine your home’s power needs and calculate how many panels are necessary.
- What percentage of power do you want to draw from solar PV?
- By how much do you want to reduce your electricity bill?
- How much do you need backup electricity?
- Are there many power outages because of grid failure?
- What is your budget for the PV system?
- Panels are typically 3’ x 5’ in size and each one produces about a maximum of 250 watts. There are 3.5’ x 7.5’ panels that go up to 370 watts, but these are heavier and more difficult to install, maintain, and replace.
- A typical residential array produces about 3.5-5 kWh of direct current (DC) electricity. Critical loads require around 50% of that energy.
- Ensure the system complies with both local and national electrical codes and regulations (National Electric Code or NEC).
- Verify neighborhood regulations to comply with aesthetics.
- Note: The homeowner should be aware of the configuration, but a professional should install the system.
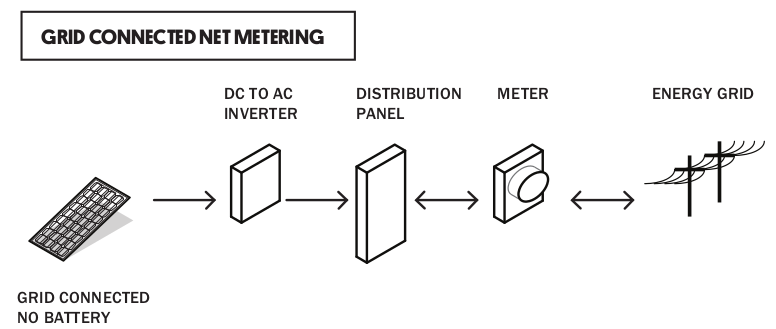
GRID CONNECTED-NET METERING
- Provides energy to running appliances (the house load). The energy contribution percentage depends on size of array and solar radiation available.
- Surplus energy generated beyond the load consumption is sent back to the power authority (PA) which is referred to as “net metering.”
- Excess energy sent back to the grid is credited at a discounted service rate.
- Provides some stability to the grid.
- Reduces dependence on the PA.
 |  |
- Reduces Dependence on PA
- Provides PA with renewable energy
- If the PA fails, the user receives no energy, unless the fixture and appliances can work off direct current (DC) energy.
- Higher installation costs and longer return on investment.
- Complexity of automated or manual switch transfer during power outage.

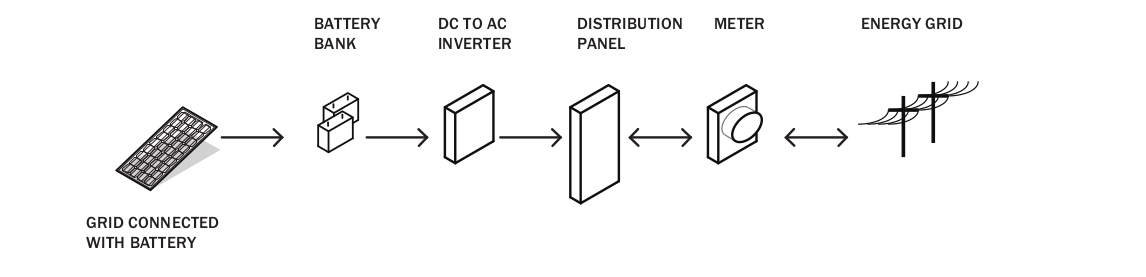
GRID CONNECTED / HYBRID SYSTEM WITH BATTERY
- Recommended system.
- Can provide backup during grid outages.
- Surplus energy produced by the PV panels is stored in a battery bank and excess power is sent back to the PA.
- When excess energy is produced, the user can sell or “net meter” energy to the PA at a discounted rate.
- Provides backup power to critical equipment until storage is depleted.
- Reduces dependence on PA.
- Battery provides uninterrupted reliability if the grid fails.
- Higher installation costs and longer return on investment.
- Flooded type batteries require maintenance.
 |  |

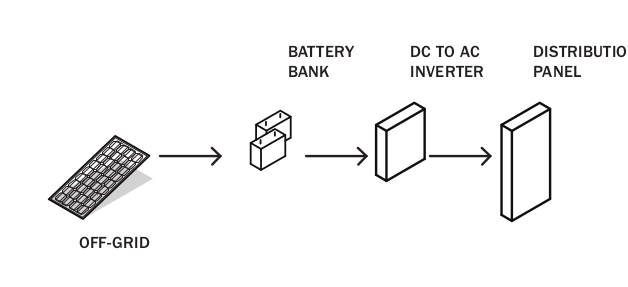
OFF GRID / AUTONOMOUS SYSTEM
- Completely disconnected from grid.
- Home relies on PV and on-site battery backup for all power needs.
- Recommended at remote locations or regions that are far away from existing public infrastructure.
- Complete independence from central grid.
- Safely runs appliances without damaging voltage spikes.
- For autonomous systems, some PV systems’ inverters include charge controllers which redirect power from the PV or PA to charge the batteries. Charge controllers are needed for charging
- Not affected by price and power fluctuations.
- If battery depth of discharge or capacity is exceeded, the system will shut down and there will be no power during the night.
 |  |
 |  |

- Identify approved vendors and certified equipment for PV system at: http://www.prgef.com/resources and forms.
- Each PV panel weighs about 3-40 pounds. Anchor a panel properly so it does not blow away during strong winds. For more information, see FEMA’s guide titled Rooftop Solar Panel Attachment: Design, Installation, and Maintenance.
- A PV system can last up to 30 years without replacement.
- Hire a professional to ensure installation complies with both local and national electrical codes and regulations.
- Do not connect the system to electric circuits by yourself. Hire an electric technician/engineer.
- A transfer switch should be installed. Refer to Strategy 18 for additional information.
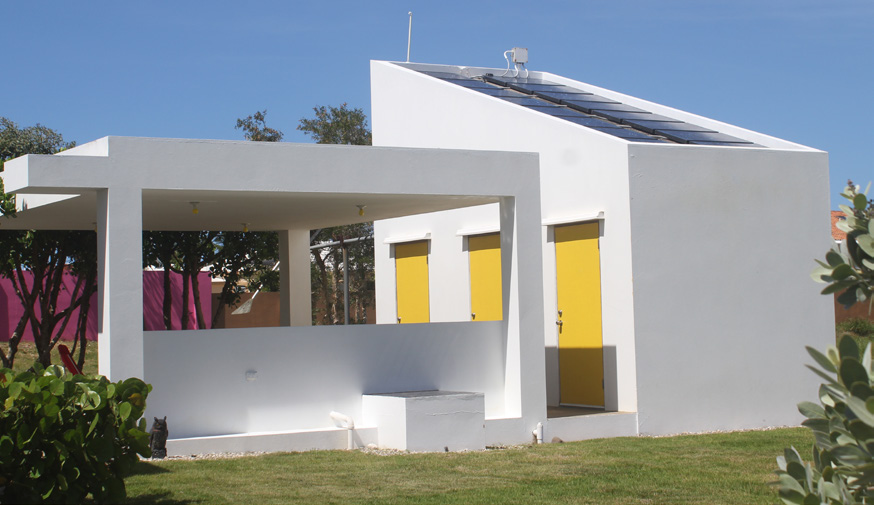
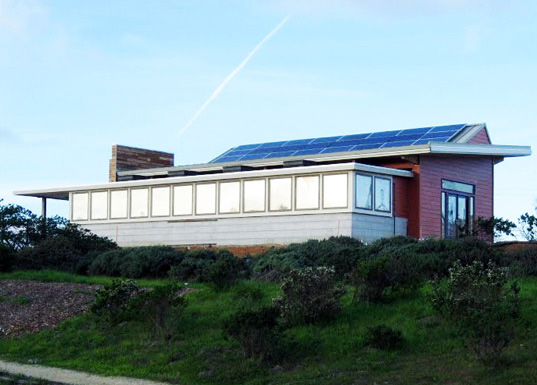
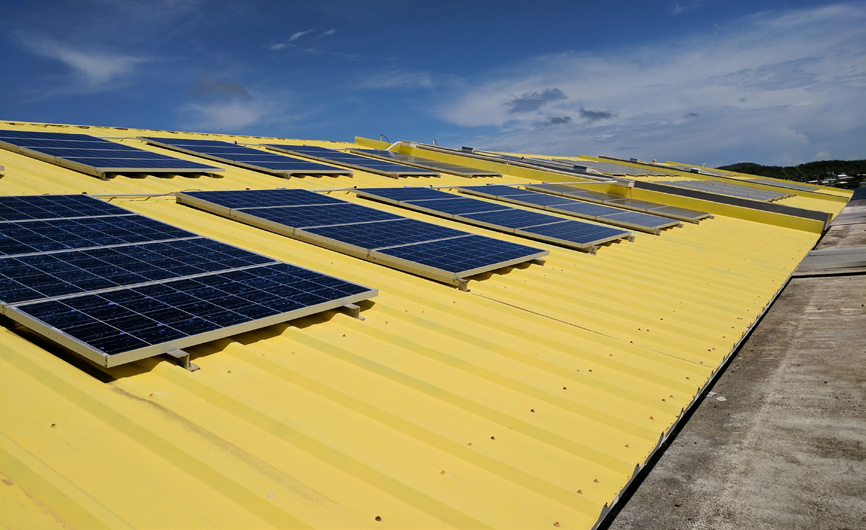
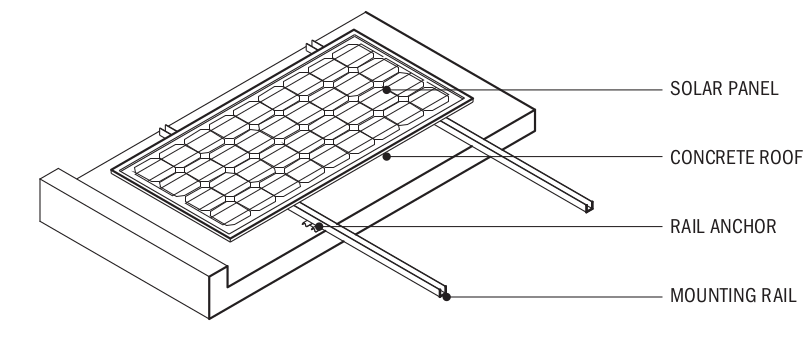
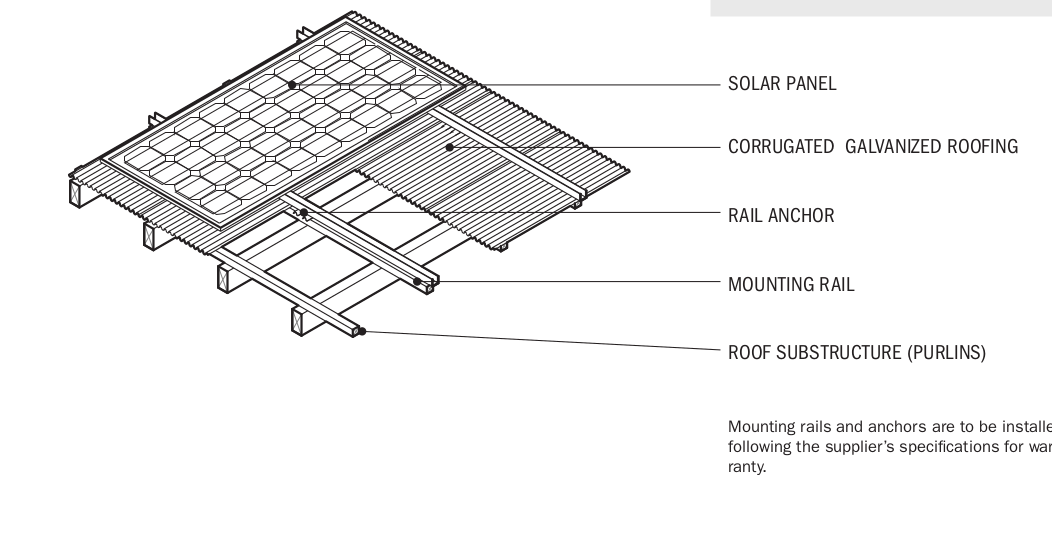
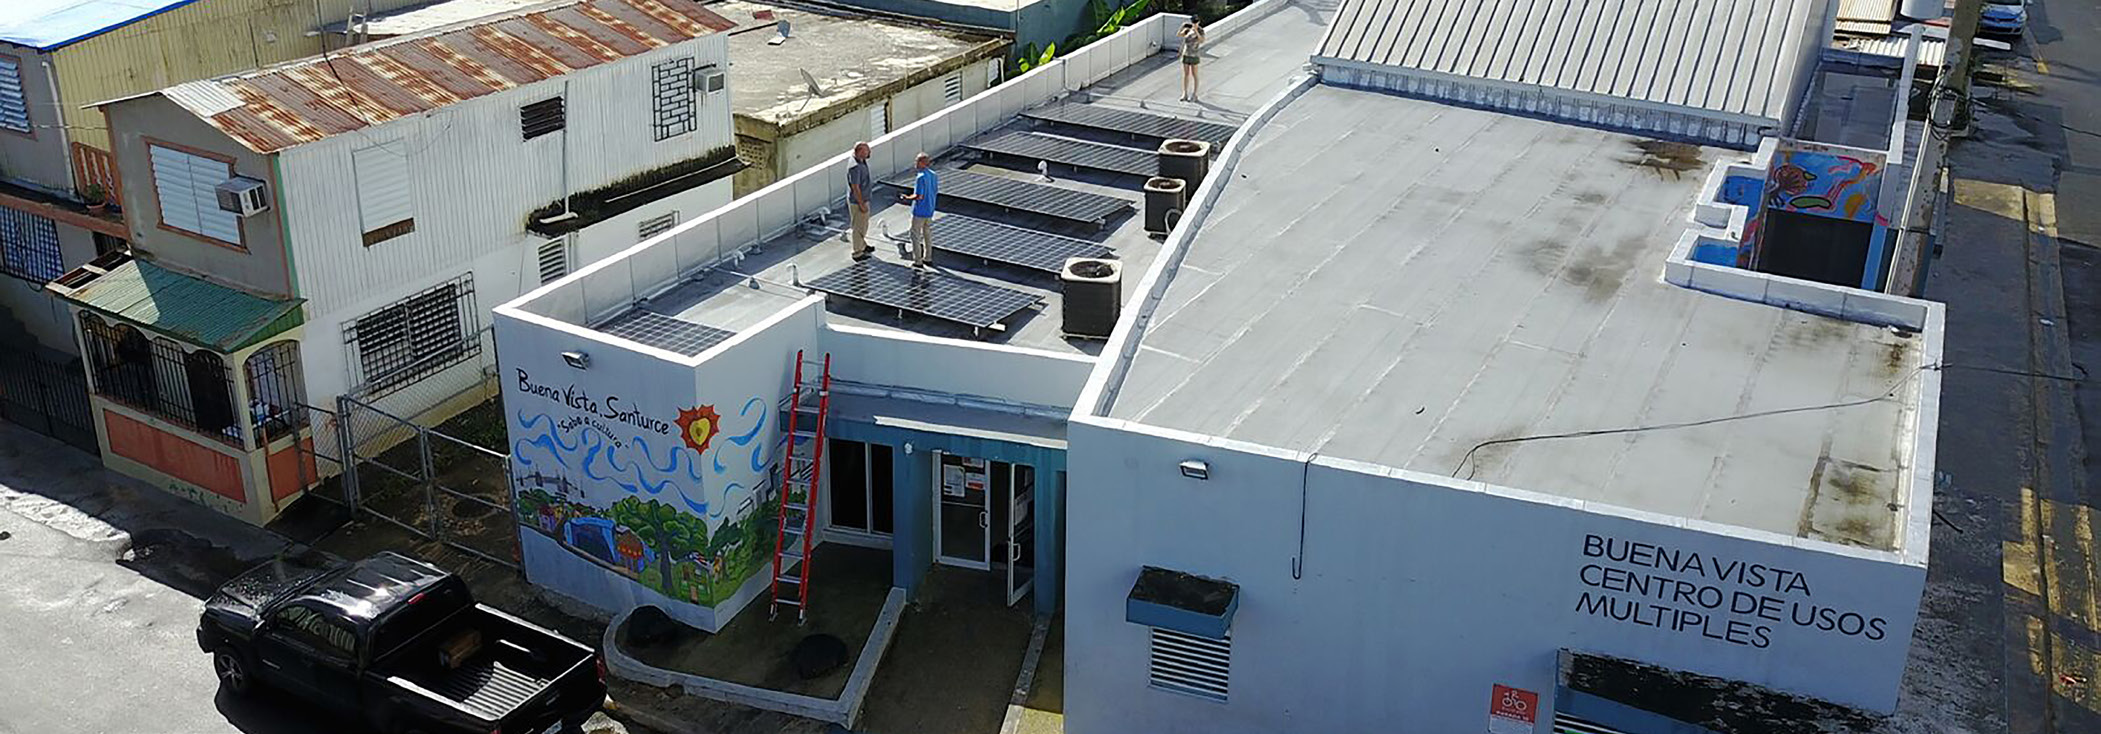
A. LOCATION: ROOF
- Can be installed in any roof, regardless of material or inclination.
- Can be installed in innovative ways, such as over carports or awnings.
- May reduce shading from trees or neighbors’ buildings.
ROOFTOP MOUNTING
 | 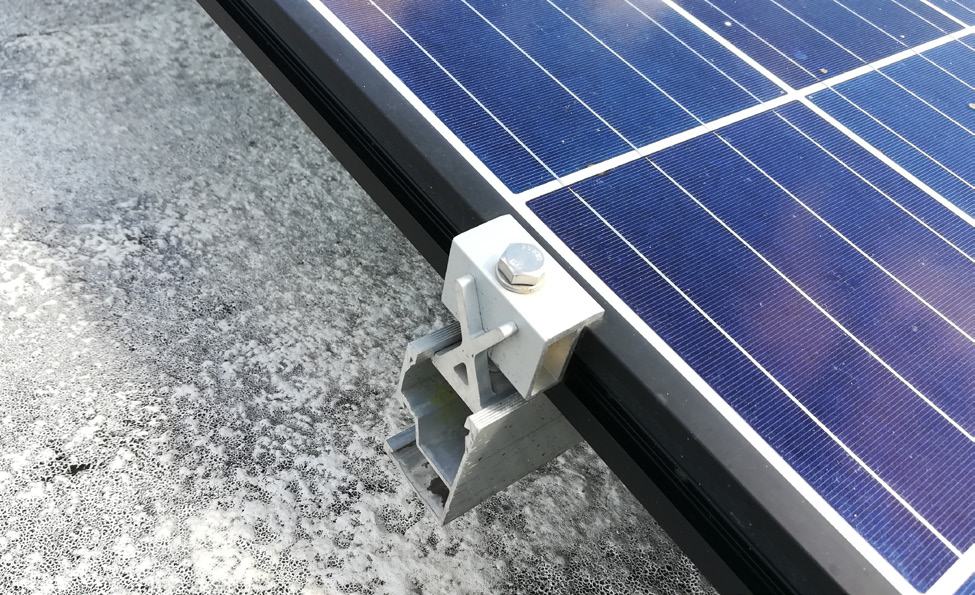 | 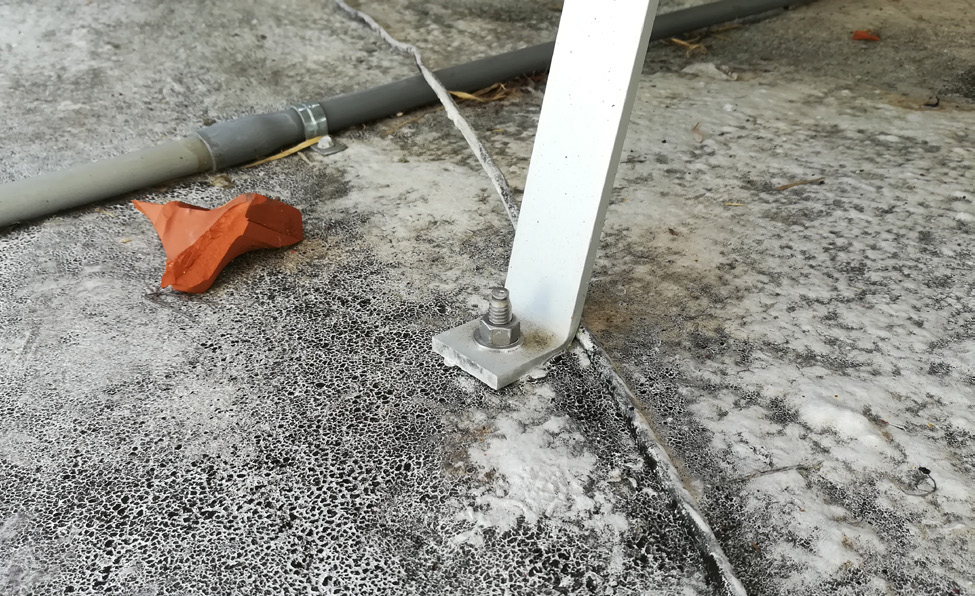 |
| ROOF ANCHORAGE FOR CONCRETE ROOFS
| ROOF ANCHORAGE FOR WOODEN ROOFS
|
- Can be installed in any roof, regardless of material or inclination.
- Can be installed in innovative ways, such as over carports or awnings.
- May reduce shading from trees or neighbors buildings.
- Exposed to uplifting caused by strong winds. Anchor properly.
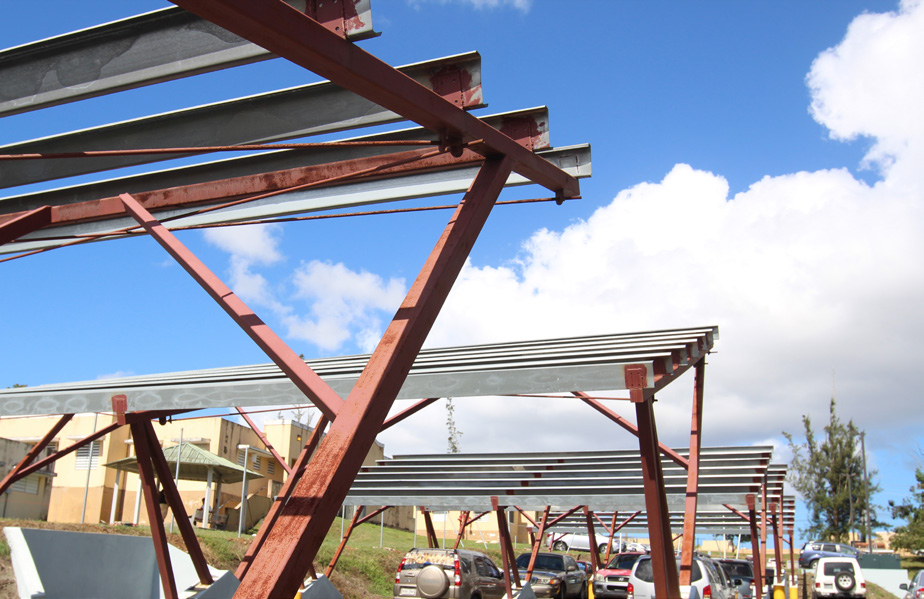
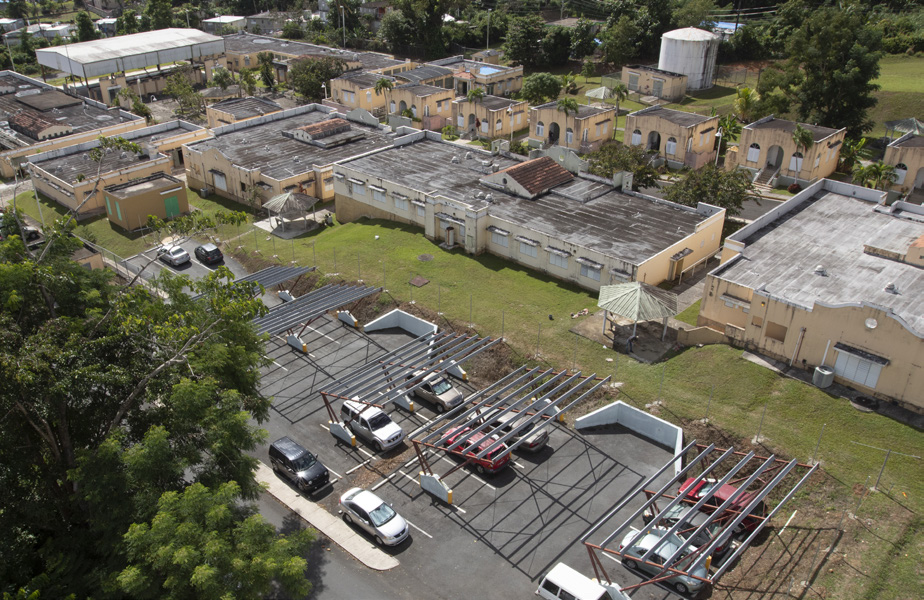
A. LOCATION: GROUND
Ground mounting is the cheapest and easiest option for installation. As with the rooftop, it provides good airflow in the back. However, horizontal space and shading may be an issue. These are highly susceptible to theft.
GROUND MOUNTING
- CHEAPEST OPTION
- NO NEED TO FORTIFY ROOF OR NO POTENTIAL DAMAGE TO ROOF MEMBRANE.
- CAN DISASSEMBLE BEFORE HIGH WINDS.
- CONVENIENT FOR HOMES THAT SIT ON A BIG LAND PLOT.
- TAKES UP A LOT OF SPACE IN SMALL LOTS.
- SUSCEPTIBLE TO THEFT.
- MAY BE MORE SUSCEPTIBLE TO SHADE BY NEIGHBORS’ TREES OR BUILDINGS.
- EXPOSED TO UPLIFTING CAUSED BY STRONG WINDS. ANCHOR PROPERLY.
 |  |
A. LOCATION: POLE
Pole mounting absorbs the benefit of sun exposure from rooftops as well as above-ground location freedom. However, these are the most difficult to install and will require additional structural support to avoid tilting and torsion due to storm winds.
POLE MOUNTING
- FLEXIBLE IN TERMS OF INSTALLATION AND PLACEMENT.
- CAN INCLUDE PASSIVE SOLAR TRACKING DEVICES THAT DETECT THE SUN’S PATH TO MAXIMIZE ENERGY COLLECTION
- DEMANDS SPECIAL INSTALLATION BECAUSE OF STRUCTURAL LOADING SPECIFICATION NEEDS.
- IT IS MORE EXPENSIVE AND REQUIRES PROFESSIONAL INSTALLATION.
- REQUIRES ADDITIONAL STRUCTURAL SUPPORT TO AVOID TILTING AND TORSION.
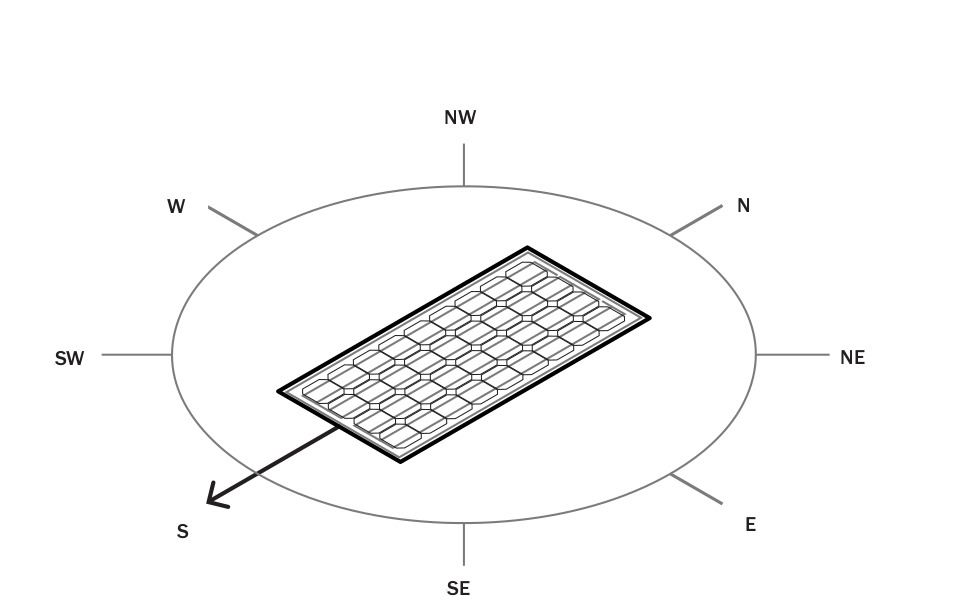
| B. PLACEMENT: ROTATION
|  |
| B. PLACEMENT: INCLINATION
| 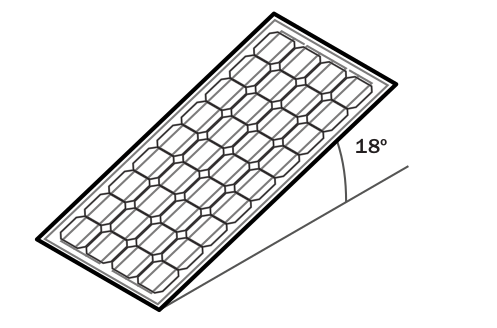 |
| B. PLACEMENT: VEGETATION
|  |
|
|

STRING INVERTER (GRID-TIED)
PV modules are connected in strings, providing interactive operation with the house load and grid. SMA Sunny Boy and Sunny Island have Secure Power Supply feature that runs appliances without grid and battery systems.
**SMA Sunny Boy and Sunny Island have the Secure Power System (SPS) feature that runs appliances without grid and battery systems.
PROS
- The most commonly used inverter and can be used with grid-tied or stand- alone.
- The secure power system (SPS) feature of the SMA module allows owner to manually power appliances in the home through a dedicated outlet to run appliances without batteries or grid.
- The secure power system (SPS) feature of the SMA module allows owner to manually power appliances in the home through a dedicated outlet to run appliances without batteries or grid.
CONS
- It does not typically operate as stand-alone.
MICRO-INVERTER (GRID-TIED)
PV modules are connected individually, eliminating the need for a central inverter while providing interactive operation with the house load and grid.
PROS
- Prevents system from failing due to panel malfunction.
- Equalizes the system for optimum performance.
CONS
- Shorter lifespan
- Will not work without the grid
STAND-ALONE INVERTER
PV modules are connected in strings, providing interactive operation with the house load, inverter, and battery backup. Recommended inverters: SMA Sunny Boy and Sunny Island, Schneider, Tesla, Outback and Matcha Sine Magnum are leading stand-alone inverters
PROS
- Operates as a stand alone system.
CONS
- Need to provide backup power to provide redundancy and power during the evening or times of low power.
HYBRID INVERTER/CHARGER 3KW 48VDC - NEEDS BATTERY BANK
A hybrid inverter is primarily used for grid- tie (selling back to the utility company) purposes but also has the added feature that they provide backup power to your home when the electric utility fails.
PROS
- Inverter inside the unit
- Storage space
- Battery is configurable if upgrade is desired.
- Better with extreme temperatures
CONS
- Capacity could be bigger
MICRO-INVERTER (GRID-TIED)
A hybrid inverter is primarily used for grid- tie (selling back to the utility company) purposes but also has the added feature that they provide backup power to your home when the electric utility fails.
PROS
- Inverter inside the unit
- Storage space
- Battery is configurable if upgrade is desired.
CONS
- Capacity could be bigger
HYBRID INVERTER 7.5 KW WITH BACKUP BATTERY CAPABILITY BACKUP BATTERY CAPABILITY (400VDC NOM.)
A hybrid inverter is primarily used for grid- tie (selling back to the utility company) purposes but also has the added feature that they provide backup power to your home when the electric utility fails.
PROS
- It is compact and has the charge controller inside.
- Scaleable
CONS
- Premium cost
- Tesla requires Tesla battery brand
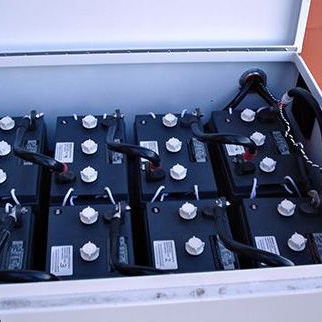
- Batteries store surplus energy for future use.
- Preferred; if connecting to batteries, a charge controller is needed to charge batteries.
- Battery chemistry is generally divided into two main categories: lead and lithium.
LEAD-ACID BATTERIES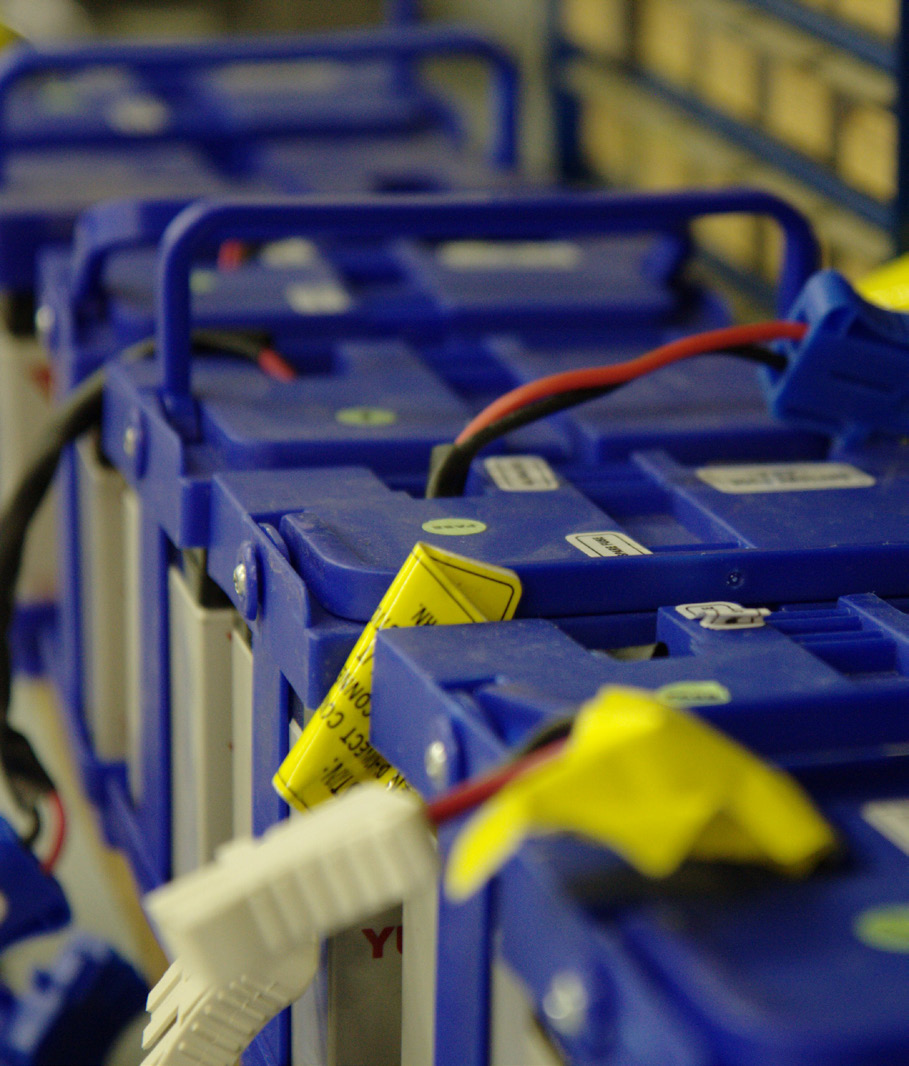
- Flooded Lead-Acid batteries- they produce hydrogen outgas when charging and can be dangerous in poorly ventilated spaces.
- Deep Cycle Lead-Acid Batteries- [recommended] can discharge below 50% depth of discharge (DOD) without damaging the battery.
- Produce hydrogen when charging
- Valve-Regulated Lead-Acid (VRLA)– it re-combines outgassing when charging with minimum emissions.
- Sealed VR Wet
- Absorbent Glass Matt (AGM)
- Gel Type
- Lead Nano-Carbon– can discharge up to 70% depth of discharge, which is a way to identify how deeply the battery is discharged.
- DISCHARGE BELOW 50% WITHOUT DAMAGING THE BATTERY
- DANGEROUS IN POORLY VENTILATED SPACES
LITHIUM ION BATTERIES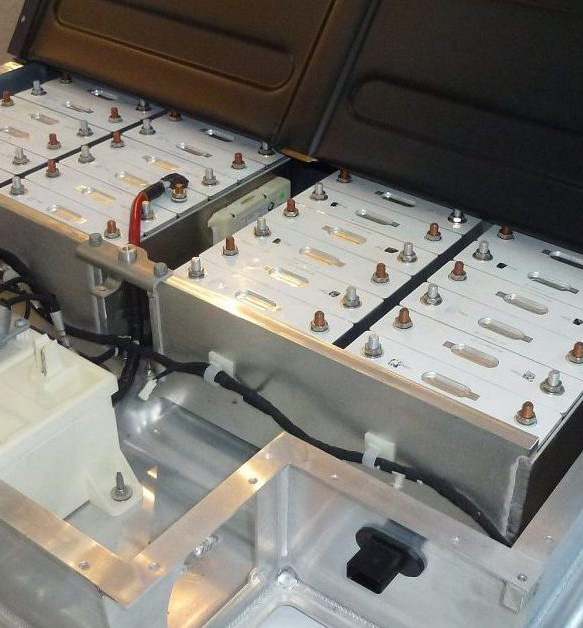
- Lithium Batteries - (Longer Life: higher charge/ discharge cycles) – higher initial cost ($)
- Lithium-Ion - can be discharged to 90% of its capacity. Typically, it can endure three times the number of cycles compared to lead-acid.
- Lithium Ferro Phosphate – usually found in nominal 24V and 48V packages.
- DISCHARGE 90% OF ITS CHARGE
- MORE EXPENSIVE
DISCLAIMER
DO hire a professional to ensure that installation complies with local codes and regulations. Code or NEC).
DO verify neighborhood regulations or talk with your neighbor to comply with aesthetic concerns.
DO NOT connect the system to electric circuits by yourself. Hire an electric technician/engineer for this purpose.
OPERATIONS AND MAINTENANCE TIPS
- Register your system with your insurance company in case of natural disasters or theft.
- Monitor PV array output monthly to detect any anomaly. Some PV installers or manufacturers offer real-time monitoring of system performance and maintenance plans.
- Inspect your PV system to check for:
- Dirt on array
- Storm damages
- Loose cables
- Inspect and protect your system by dismounting your panels before a storm event, whether it is a pole-mounted system or a ground-mounted system.
- For off-grid and bimodal systems, be sure to inspect your battery bank regularly and look out for:
- Battery voltage inconsistencies
- Metal corrosion
- If you have lead batteries, check depleted electrolyte levels by verifying water levels in the lead batteries.
- Preparations prior to hurricane landfall:
- Property owners or operators should have a maintenance staff or a contractor that adequately prepares their PV systems prior to landfalling hurricanes or forecasted severe windstorms by performing the following:
- Debris removal from roof drains, scuppers, and gutters.
- Removal of loose objects such as buckets, lumber, and sheet metal from the roof and surrounding areas.
- If there is enough time, check tightness of the PV array’s bolted connections with a torque wrench.
- Property owners or operators should have a maintenance staff or a contractor that adequately prepares their PV systems prior to landfalling hurricanes or forecasted severe windstorms by performing the following:
- After a severe wind storm[1]
[1] Rooftop Solar Panel Attachment: Design, Installation, and Maintenance https://www.fema.gov/media-library-data/1535554011182e061c2804fab7556ec8...
- Property owners or operators should have a maintenance staff or a contractor perform post severe windstorm damage assessments and take any actions needed for repairs or improvements to their system, including the following:
- Check the PV array for damage.
- Remove, replace, or temporarily secure loose panels.
- Check the roof covering for damage caused by wind-borne PV panels or other debris.
- Check tightness of the PV array’s bolted connections.